
Cloud DMA explained
Cloud DMA is the setup requirement behind full ESP and map tools on DOTA2 Cheats. Here is what it is, why it exists, and how to approach it without guesswork.
What Cloud DMA Means in Plain Language
Direct Memory Access, or DMA, is a decades-old concept in computing. It describes a way for a piece of hardware to read memory without routing every single request through the main processor. In the cheat and overlay world, "DMA" got attached to external hardware that reads a game's memory from outside the game process itself, rather than injecting code inside it. Cloud DMA, as used on DOTA2 Cheats, borrows that same idea and moves the heavy lifting off your local machine and into a managed pipeline, so your PC only has to handle a lightweight overlay while the harder memory-reading work happens somewhere that is not sitting inside the DOTA 2 process.
If none of that means much to you yet, that is fine. You do not need a computer engineering degree to use it correctly. What matters practically is this: Cloud DMA is not a toggle you flip for fun, and it is not a marketing buzzword slapped onto an ordinary injector. It is the actual architecture behind why the overlay can show hero positions, items, and timers without behaving like a traditional injected DLL that lives inside the game's own memory space. That distinction is also why the setup requirements look the way they do, which we cover in detail below.
Think of it less like "installing a cheat" and more like "connecting a second, low-footprint viewer to information your own PC already has." The game still runs normally. Your inputs still go through your mouse and keyboard like always. What changes is that a separate, tightly scoped reading pipeline surfaces map and hero data to an overlay window, and that pipeline is what people mean when they say "Cloud DMA" in the context of DOTA2 Cheats.
Why dota2cheats.net Requires Cloud DMA
A fair question new users ask is why the site insists on a specific architecture instead of just shipping a simple downloadable tool with no prerequisites. The honest answer is stability and longevity. Memory reading approaches that live entirely inside the game process tend to be fragile. A single client patch can break them instantly, they tend to be heavier on CPU and RAM because they share resources directly with the running game, and they present a much larger footprint for anything scanning process memory. None of that is a good trade for a tool meant to be used across dozens or hundreds of ranked games.
Cloud DMA exists specifically to solve that problem set. By separating the reading layer from the rendering layer, the setup can survive minor client updates more gracefully, keep local resource usage low, and give the overlay a cleaner separation from the game's own executable space. That is the whole reason the site's requirements page talks about HVCI, Core Isolation, TPM, and Secure Boot instead of just saying "download and run." Those Windows features are not arbitrary hoops. They are the platform guarantees that the Cloud DMA pipeline depends on to function correctly and consistently.
In other words, requiring Cloud DMA is not the site making your life harder for no reason. It is the site refusing to sell you an unstable toy. If you have ever used a cheap injector-based tool that stopped working the day after a patch, you already understand why an external, hardware-aware approach is worth the small amount of extra setup effort.
The short version
- Cloud DMA separates memory reading from the game process itself.
- It reduces local resource usage compared to fully injected approaches.
- It depends on specific Windows security features being enabled correctly.
- It is the backbone behind ESP, map data, timers, and overlay stability.
HVCI and Core Isolation: What They Actually Do
Hypervisor-protected Code Integrity, shortened to HVCI, is a Windows security feature that uses virtualization to check that code running in the kernel has not been tampered with. Core Isolation is the umbrella settings page inside Windows Security where HVCI lives alongside other memory integrity protections. When these are enabled correctly, Windows creates a more predictable, more protected memory environment, and that predictability is exactly what a Cloud DMA pipeline needs to talk to the system the way it expects to.
A lot of users assume these settings exist purely to block tools like this one. That is only half true. HVCI and Core Isolation exist first and foremost to protect ordinary users from kernel-level malware. The side effect is that they also create a consistent memory model that well-built external tools can work with reliably. Badly built tools that rely on sketchy kernel drivers tend to conflict with HVCI. Cloud DMA is designed around working alongside it rather than fighting it, which is a big part of why setup asks you to turn it on rather than disable it.
If HVCI is off, or if it is in an inconsistent state because of a driver conflict, a hardware change, or a Windows update that quietly reset a toggle, you may see instability that looks unrelated to Cloud DMA at first glance: stutters, overlay elements failing to update, or the client refusing to attach properly. Checking Core Isolation status is one of the first things any competent troubleshooting session should confirm, and it takes less than a minute inside Windows Security.
TPM and Secure Boot: The Other Half of the Requirement
Trusted Platform Module, or TPM, is a small chip (or firmware equivalent on newer boards) that stores cryptographic keys and helps verify that your system has not been tampered with at a low level. Secure Boot is a firmware feature that checks that the software your PC boots into has not been swapped out or modified by anything unauthorized before Windows even loads. Neither of these was designed with gaming overlays in mind. They exist because modern operating systems assume a baseline of hardware-backed trust, and Windows 11 in particular made both close to mandatory for a supported install.
For Cloud DMA specifically, TPM and Secure Boot matter because the pipeline expects to run on a system that matches the trust assumptions modern Windows makes. A machine with Secure Boot disabled, or TPM missing or turned off in BIOS, is a machine running in a less predictable state than the one the tooling was built and tested against. That does not always mean it will fail outright, but it does mean you are removing a layer of consistency that would otherwise make setup smoother and support faster when something does go wrong.
The good news is that most Windows 10 and Windows 11 machines built in the last several years already have TPM 2.0 hardware sitting dormant in BIOS, waiting to be switched on. Secure Boot is frequently available too, sometimes just labeled differently depending on the motherboard manufacturer. Checking and enabling both is usually a five-minute BIOS visit, not a hardware purchase. The full walkthrough, including menu names across common BIOS vendors, lives on the Windows setup checklist.
What Features Cloud DMA Actually Unlocks
With the theory out of the way, here is what a correctly configured Cloud DMA setup actually gives you inside a match. This is the part most people care about, and it is worth being specific rather than vague, because vague marketing language is exactly what this article is trying to avoid.
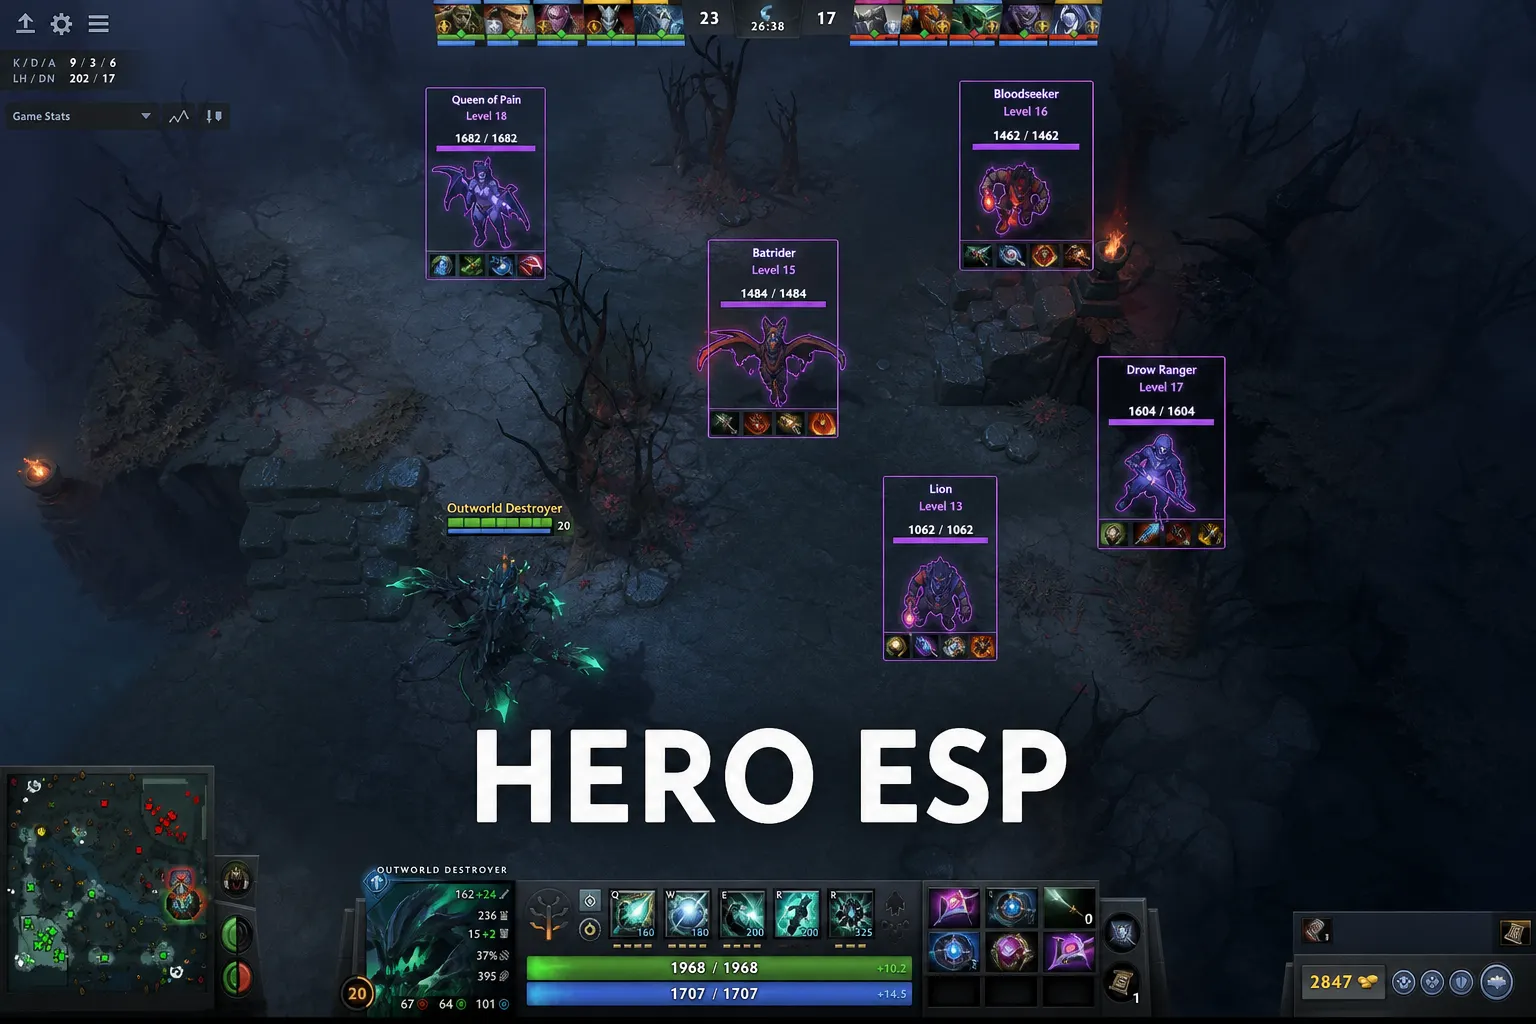
- Hero ESP: enemy hero positions rendered through fog of war, including level and item context, so you are not relying purely on ward coverage or memory of where someone last recalled.
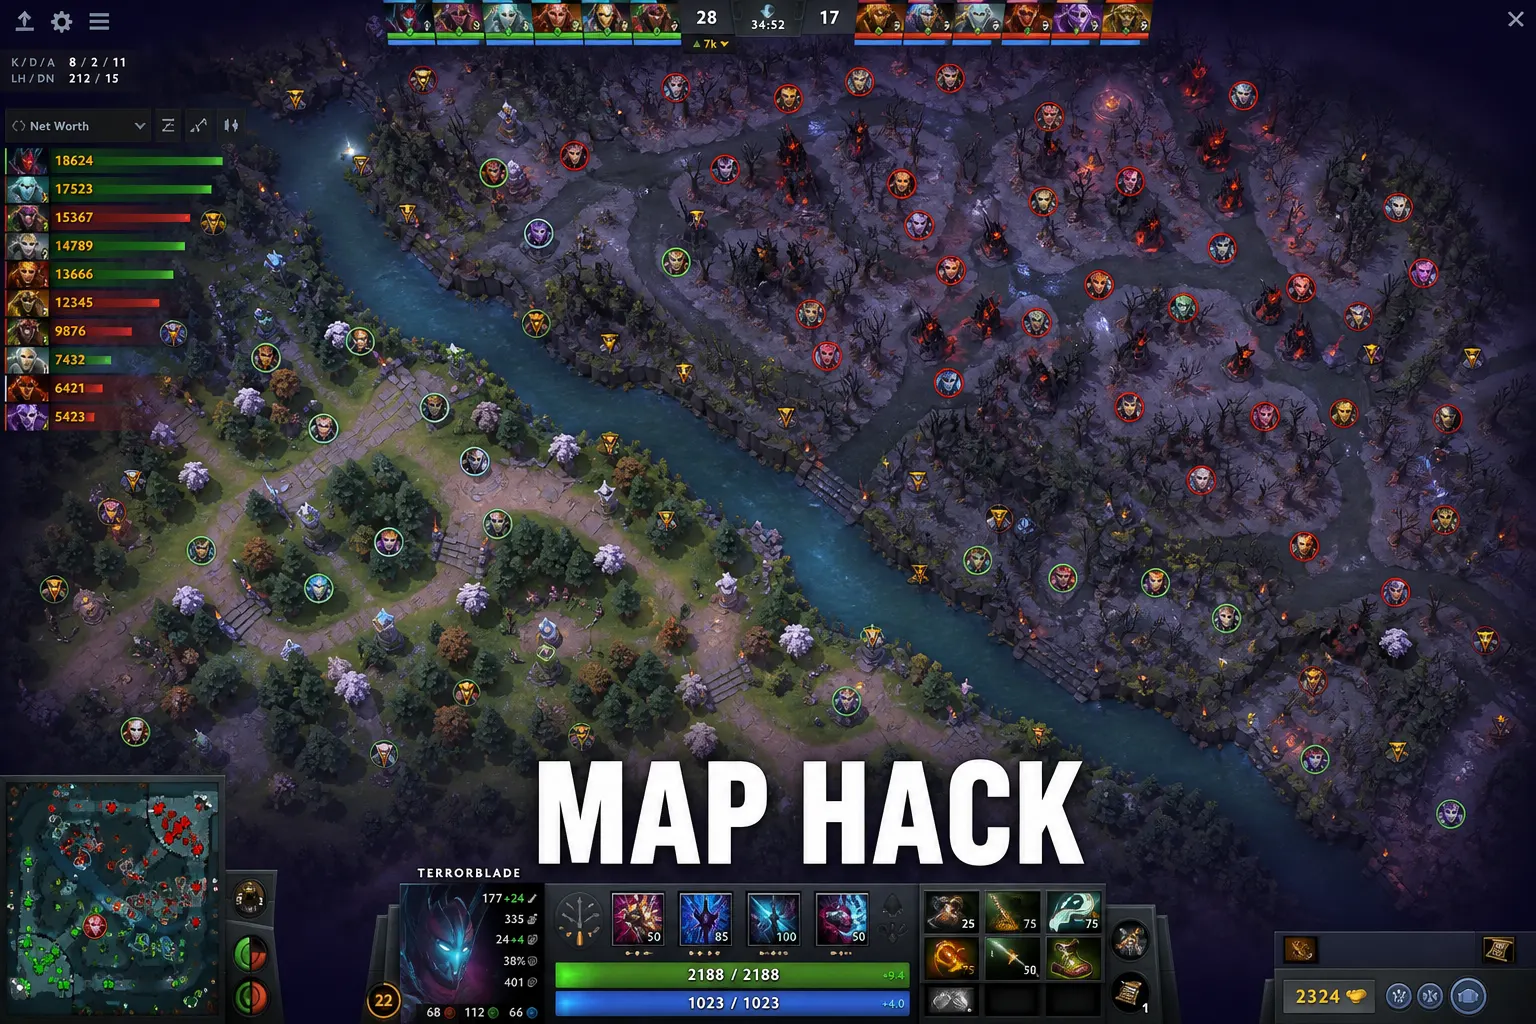
- Map hack style awareness: broader map information beyond your natural vision radius, useful for tracking rotations, jungle stacking, and objective setups across both halves of the map.
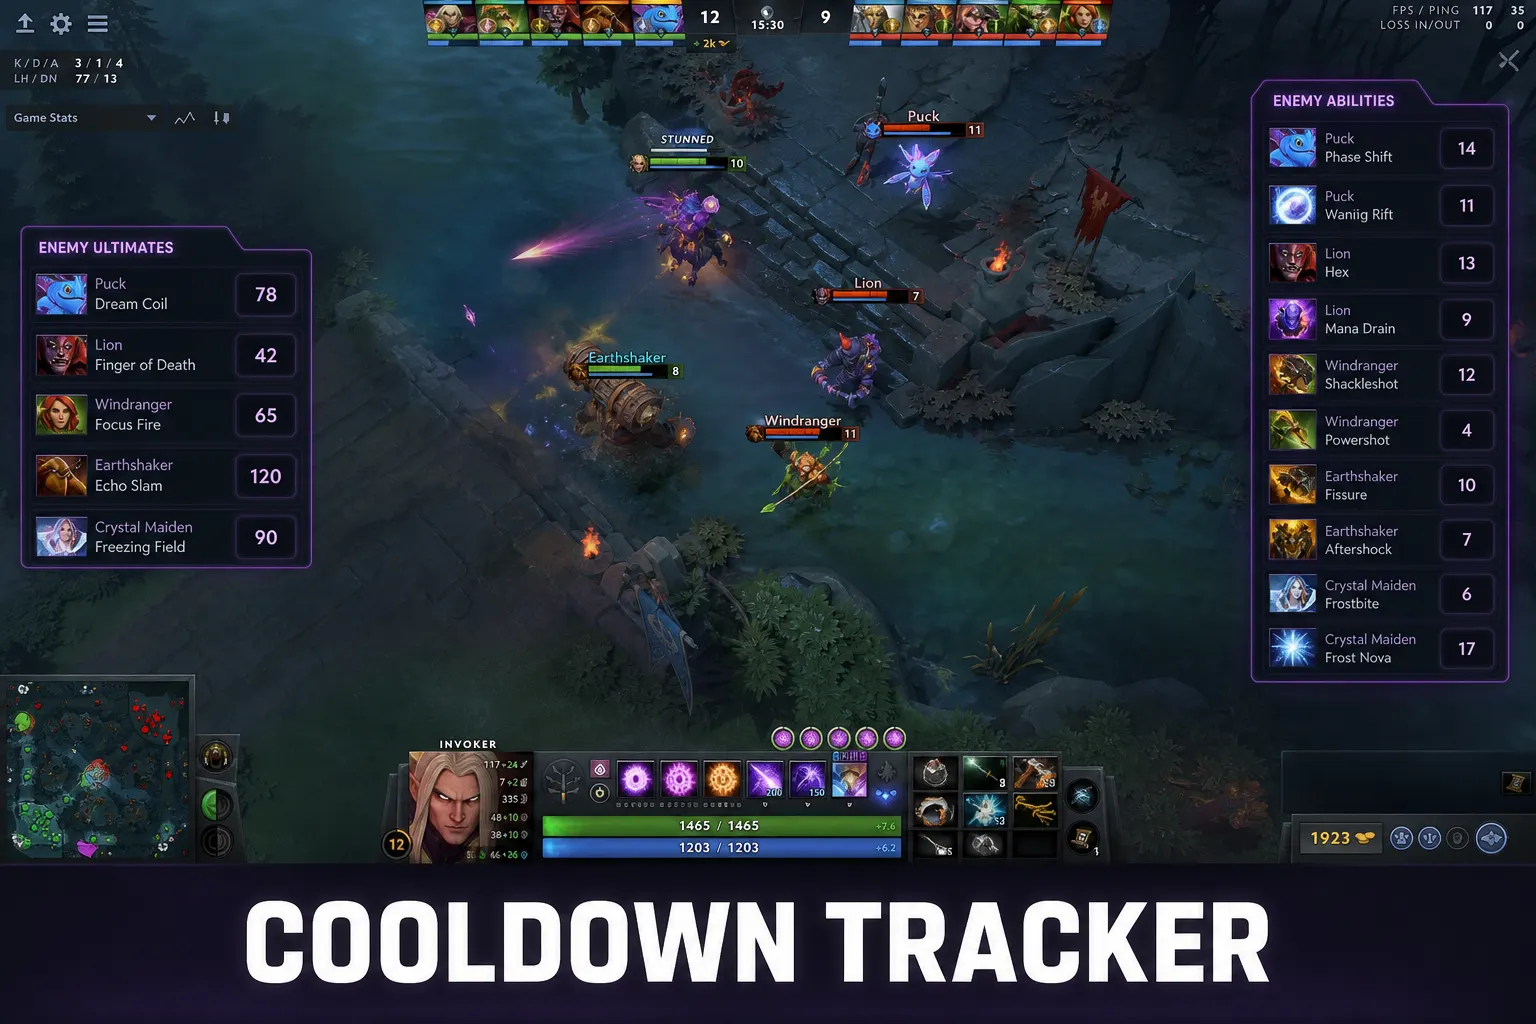
- Cooldown and Roshan timers: numeric tracking of key enemy cooldowns and the Roshan respawn window, removing the guesswork that usually comes from mentally tracking a dozen things at once.
- Ward and vision overlays: awareness of where observer coverage matters most, which pairs directly with the map information layer instead of replacing it.
Each of these features depends on the same underlying pipeline. If Cloud DMA is healthy, all four tend to behave consistently. If it is misconfigured, you typically see partial failures first, such as ESP flickering while timers still work, rather than a clean total failure. That pattern itself is a useful diagnostic signal, which we get back to in the troubleshooting section further down.
Performance: What to Actually Expect
One of the biggest selling points of moving memory reading off the local process is performance. A poorly built injected tool can add measurable CPU overhead because it is sharing the same execution thread priorities as the game engine. Cloud DMA's entire design goal is to avoid that by keeping the heavy read operations away from your rendering pipeline, so your frame times stay close to what you would see running DOTA 2 with no overlay at all.
In practice, that means most users on a mid-range or better gaming PC should not notice a meaningful FPS hit once everything is configured correctly. Where people do see performance problems, the root cause is almost always something else entirely: background overlays fighting for the same rendering hooks, an outdated GPU driver, or a laptop running in a battery-saving power profile that throttles clocks regardless of what software is installed. Before assuming Cloud DMA itself is the bottleneck, it is worth ruling out these ordinary suspects first.
It also helps to set realistic expectations rather than perfect ones. "Low impact" does not mean "zero impact." Any overlay drawing extra elements on screen uses some GPU time to render those elements, the same as a chat overlay or a frame counter would. What Cloud DMA promises is that the reading side of the equation, which is the expensive part, stays off your local CPU budget as much as architecturally possible.
Myths vs Reality
There is a lot of noise around DMA-style tooling, some of it from people who have never actually used a properly built pipeline, and some of it from outdated assumptions about how injected cheats used to work a decade ago. Separating myth from reality matters if you want to make an informed decision rather than a scared or overconfident one.
Myth: Cloud DMA means a physical hardware card is required
Traditional hardware DMA cheating setups in other games sometimes did require a second physical PC and a PCIe capture card. That is not how Cloud DMA on DOTA2 Cheats works. The "cloud" part of the name specifically refers to offloading the heavy lifting to a managed backend rather than requiring you to buy extra hardware and wire two machines together. Setup happens entirely on your existing gaming PC.
Myth: Enabling HVCI, TPM, and Secure Boot is dangerous or will break your PC
These are standard Windows security features that Microsoft recommends for every modern PC, tool or no tool. Millions of ordinary users run with all three enabled and never think about it again. Enabling them does not brick your system; at worst it occasionally surfaces an older, incompatible third-party driver that needed updating anyway.
Myth: Once it is set up, it will never need attention again
This is the opposite failure mode of excessive fear: blind faith. Windows updates occasionally reset settings. BIOS updates can change default states. Game patches change how the client behaves. Treat setup as something you glance at occasionally rather than something you configure once in 2024 and never think about again.
Reality: it is a system, not a magic switch
The honest reality sits between the two myths. Cloud DMA is a well-engineered, external memory reading architecture that depends on a handful of concrete, checkable Windows settings. When those settings are correct, it works reliably. When they drift, symptoms show up. There is no mysticism involved, just a checklist worth actually following.
Purchase and Delivery Walkthrough
Buying access is a straightforward checkout flow rather than a forum message hunt or a sketchy file share. Checkout for DOTA2 Cheats runs through the zadeyo checkout page, where you pick a plan, complete payment, and receive delivery details tied to your order. There is no waiting days for a manual reply just to get a download link.
Once checkout completes, credentials and dashboard access arrive quickly, and from there the actual client download and setup steps begin. This is the point where the Windows requirements discussed above stop being theoretical and start mattering directly: if HVCI, Core Isolation, TPM, and Secure Boot are already sorted out before you buy, your first-run experience is close to plug and play. If they are not, your first session becomes a setup session instead of a gaming session, which is avoidable with about ten minutes of preparation beforehand.
Plans typically break down into shorter-term and longer-term options, with pricing and feature parity details kept current on the homepage and the FAQs page rather than duplicated here where they could go stale. If you are comparing options, read those pages side by side with the full feature list so you know exactly what each tier includes before paying.
A Troubleshooting Mindset, Not a Panic Response
When something does not work on the first try, the instinct for a lot of players is to assume the product is broken and demand an instant refund. A more productive instinct, and one that gets issues resolved faster, is to treat the situation like a checklist problem rather than a mystery. Ask, in order: is Windows fully updated, is HVCI/Core Isolation actually toggled on and not just visually appearing on, is TPM enabled in BIOS and not just present as a chip, is Secure Boot enabled, and was the client installed after those settings were confirmed rather than before.
A surprisingly large share of support tickets resolve the moment someone actually opens Windows Security and Core Isolation and confirms the toggle state, rather than assuming it from memory. Settings can silently revert after a major Windows feature update. BIOS settings can reset after a firmware flash or a CMOS battery replacement. None of that means anything is wrong with Cloud DMA itself; it means the platform underneath it moved.
If you have gone through the checklist methodically and something still refuses to behave, that is exactly the point where you stop guessing and ask for help rather than continuing to poke at settings randomly. Random changes without documentation make it harder for anyone, including you, to figure out what actually fixed the problem later.
Getting Real Help on Discord
Support does not live behind a ticket queue with a four-day reply time. The DOTA2 Cheats Discord is where setup questions, patch-day status updates, and troubleshooting actually happen in real time with people who work with this specific pipeline daily. Before posting, it genuinely helps to have already checked the basics: Windows version, whether HVCI/Core Isolation shows enabled, whether TPM and Secure Boot are on, and what exact error or symptom you are seeing rather than just "it doesn't work."
Specific reports get specific answers fast. Vague reports get a checklist back, which just delays things by one extra round trip. Screenshots of the Windows Security Core Isolation page and the exact overlay behavior (nothing rendering at all vs partial rendering vs a crash) are the single most useful things you can bring to a support conversation.
Setting Expectations Before Day One
None of this should feel intimidating. The list of requirements looks longer written out in an article than it feels in practice, because most of it is a handful of Windows Security toggles and a couple of BIOS checks that take a few minutes total once you know where to look. The goal of documenting it this thoroughly is not to scare anyone off, it is to make sure your first session is a gaming session and not a debugging session.
Treat the requirements as a one-time investment that pays off across every match afterward. A machine correctly configured for HVCI, Core Isolation, TPM, and Secure Boot is also, incidentally, a more secure machine in general, independent of anything related to DOTA 2. That is a rare case where "doing it the recommended way" and "doing it the secure way" point at exactly the same checklist.
Comparing Cloud DMA to Traditional Injected Tools
It helps to understand what Cloud DMA is replacing, not just what it is. Traditional injected tools work by loading a DLL directly into the target game's own process memory space. That approach was common for years because it was relatively simple to build, but it comes with a handful of structural downsides that repeatedly caused problems for users. The injected code shares CPU scheduling with the game itself, which is part of why older tools were notorious for tanking frame rates on anything but a top-tier machine. It also means the tool's memory footprint sits directly inside a process that gets scrutinized constantly, which made injected tools brittle against routine client updates.
Cloud DMA sidesteps both problems by design rather than by luck. Because the reading layer sits outside the game's own process, a minor client patch that shuffles memory offsets around is less likely to produce a total, catastrophic failure the way it would for a tool woven directly into the executable. And because the heavy computation happens off your local CPU thread, the performance profile stays closer to a clean, overlay-free session than an injected alternative ever could.
None of this means Cloud DMA is invincible or immune to every possible disruption. Client updates can still require pipeline adjustments on the backend, which is why staying subscribed to status updates in the Discord matters after major DOTA 2 patches. The difference is architectural resilience, not a guarantee of zero downtime ever. Understanding that distinction helps set realistic expectations rather than either extreme of blind trust or reflexive suspicion.
Hardware Compatibility Notes
Most gaming PCs built within the last five to seven years already meet the hardware side of these requirements without needing any purchase. TPM 2.0 has been a standard inclusion on motherboards since well before Windows 11 made it a headline requirement, often sitting dormant in BIOS because the previous owner or a fresh Windows 10 install never needed it enabled. The same is generally true of UEFI firmware capable of Secure Boot, which has been the default boot mode on new systems for close to a decade now.
Older systems, particularly ones upgraded piecemeal over many years with an original motherboard from the Windows 7 era, are the more likely candidates to run into a genuine hardware limitation rather than just a disabled setting. If BIOS genuinely has no TPM option anywhere in its menus, and the board predates roughly 2016, a hardware TPM module may need to be purchased separately if the motherboard has a header for one, or the system may simply not be a good long-term candidate for any Windows 11 requirement, DOTA2 Cheats related or otherwise.
Laptops deserve a specific mention here, since manufacturer-locked BIOS menus sometimes hide these toggles under vendor-specific naming or bury them a few submenus deeper than a typical desktop board. If you cannot locate TPM or Secure Boot options on a laptop, checking the manufacturer's own support documentation for your exact model number usually surfaces the correct menu path faster than blind clicking through BIOS screens.
A Realistic First Session Timeline
To make this concrete, here is roughly what a smooth first session looks like end to end for someone starting from a completely unconfigured machine. Checking and enabling TPM and Secure Boot in BIOS takes about five to ten minutes, including the restart to get into firmware settings in the first place. Enabling HVCI and Core Isolation inside Windows Security takes another minute or two, plus a restart to apply. Verifying both sets of settings actually stuck after that restart takes another couple of minutes.
From there, checkout through the zadeyo checkout page and receiving dashboard access happens quickly, typically within minutes of completing payment. Downloading and running the installer, including the Cloud DMA portion of setup, adds another handful of minutes depending on connection speed. All told, a machine starting from zero can realistically be fully configured and ready for a first match within twenty to thirty minutes, most of which is BIOS navigation and restarts rather than anything technically difficult.
Machines that already meet the requirements, which describes a large share of gaming PCs built in the last several years, can skip straight to checkout and installation, with the whole process taking closer to five minutes from payment to a working overlay in a private lobby.
Where to Go Next
If you have not already gone through it, the safe Windows setup checklist walks through every toggle mentioned above in step-by-step order with screenshots of where to find each setting. The FAQs page answers the most common edge cases, including hardware changes and license transfers. The features page and the demo show exactly what the overlay looks like once everything is configured, so you know what "working correctly" is supposed to look like before you ever install anything.
If you want to pair the technical side of this article with actual in-game decision-making, the map awareness guide covers how to use the information layer Cloud DMA provides without turning it into a crutch that replaces good habits entirely. General game knowledge that has nothing to do with any tool, like hero mechanics and patch history, is best sourced from Liquipedia, which stays useful regardless of what overlay you are or are not running.
Cloud DMA is not magic and it is not a myth either. It is a specific, checkable architecture with specific, checkable requirements. Meet those requirements once, keep an eye on them after major Windows or BIOS updates, and the rest of the experience tends to be exactly as smooth as the feature pages describe.